lidbeckbrent

lidbeckbrent

Saturday, December 28, 2013

A Gift for Me!

This Christmas season, the best gift I could have given myself was to turn myself off! And I did!  No blogging through Christmas and I slowed down my work machine to manageable pace!

It has been a relaxing month, taking time for holiday decorations, spending time with my husband, my family, baking, making, shopping and just enjoying just being home.

I hope everyone found some time in their own way to make their own holiday magic and also take special time for themselves!

                 Merry Christmas, Happy Holidays and a Happy New Year to you
                                         All!

            Tree of felt crafts designed by Karin Lidbeck for Good Housekeeping Dec 2013 issue. Photo by Michael Partenio

Thursday, November 14, 2013

Notes from the Field:  Harvesting the pumpkin

As a contributor to New England Homes Homes Magazine I write for the NEH Blog a few times a month.  Since my  theme this month has been all about pumpkins I thought I'd share this post that I wrote last week for www.nehomemag.com/blog

Now that Halloween is over, you may find yourself with a few un-carved pumpkins. There’s no need to discard them. The fall season is far from over and the Thanksgiving Holiday is the perfect time for using pumpkins for something more than just a pretty Jack-O-lantern.
Floral arranging is one of my greatest passions and I use pumpkins as my go-to vessel to create center stage arrangements during fall.

A typical Jack O Lantern pumpkin can be carved into the shape of a basket,   Scoop out the center.  Place wet floral foam   inside to hold flowers and a candle
A large, flat shaped pumpkin like this Cinderella pumpkin makes a great container to create a small garden scape.  I planted the miniature tropicals sold for terrariums in dirt that I placed in the inside . Then I topped it off with moss dug up from my yard.  Add garden decorative s to create a little fairy, Enjoy for a few week!

 !

As your fall garden fades, bringing some color to your landscape is easy by using the birdbath as a vessel. I mixed gourds, green pumpkins, cabbage, bittersweet and grapevine together to create this autumnal arrangement. Why not bring it to your front entryway as a great welcoming display!

Photos by Andre Baranowski

For more floral arranging and entertaining ideas for the holiday, visit my blog: yourcozyhome.blogspot.com.

Tuesday, October 29, 2013

Heirloom Pumpkin Basket

Beyond Halloween


From October through November, you will find a large variety of heirloom pumpkins at your local garden centers.  Bring them inside away from the frost and they will last through thanksgiving!

If the last remnants of your Fall garden have survived the frost, its not too late to create a pretty pumpkin centerpiece. Simply cut foliage and flowers and then add them to the interior of your favorite pumpkin

Cut a hole in top of pumpkin and place a 
container of water inside. 
Now add your arrangement.

This arrangement above is a mix of the season's last hydrangeas, late blooming asters, vine berries, poke weed, and wild flowers. Even artificial flowers would look great!

For Added Style, Create A Faux Fall Basket:
1- Pull apart a grapevine wreath and wrap a large portion loosely
      around your pumpkin.
2- Take enough of the end of the grapevine to create a faux handle.

You have just created a beautiful Faux Fall Basket!

Sunday, October 27, 2013

Carved Pumpkins: Several Of My Favorites!

With Halloween approaching, 'tis the season for carving!

I thought I'd share a few of my favorite carving projects. 
After all, there is nothing more appealing during 
Halloween than a glowing pumpkin!


A bird with leaves seemed like a twist on the scary Jack-O-Lanterns that  
I've carved over the years.  It fit perfectly within the nature inspired story 
I created for the 2013 Fall issue of 'Country Gardens' magazine.

Photo: Andre Baranowski


For the 2009 'Good Housekeeping' issue, I created a cast of amusing 
characters by adding props to enhance their personality.

Photo: Michael Partenio

Trees painted with black gloss enamel craft paint will hold up 
to rain and cold.  To make the little stars around the painted back 
trees, I used a screw-driver pushed into the pumpkins.

Photo: Michael Partenio


Create these little 7" to 8" sugar pumpkin Jack-O-Lanterns:
After carving designs into the pumpkins, I created the above 
Chinese style lanterns to sit on a mantle by using black 
poster board as a base and faux handle.

Photo: Michael Partenio


This pumpkin-bonfire was a bit hit in the 'Better Homes and Gardens
pumpkin party feature described in my previous blog.


BOOoO! An elegant Jack-O-Lantern created for 'Garden Design' magazine.

Photo: Andre Baranowski 


During Halloween, there is nothing more mystically heart-warming 
than glowing pumpkins.

 Happy Carving!

Wednesday, October 23, 2013

Planning Your Pumpkin Party


Let's Throw A Pumpkin Party!

During years of working as a stylist, I have created Fall parties for many magazines and have thrown quite a few of my own.
                    

One personal favorite is this pumpkin party designed for Better Homes and Gardens in Vermont.  It's full of great ideas that you can use to add flair to your own gathering-of-friends this Fall season!

While scouting through Vermont, I found this location through my good friend, Joanne Palmisano, of Salvage Secrets. Joanne's friend, Holly, owns this fabulous farmhouse  framed by a pumpkin patch which grows around the porch.  

I scouted the house and proposed the idea to Better Homes and Gardens, and voila! The next thing I knew I was on my way back to Vermont with photographer, Helen Norman, to create the perfect pumpkin party. I hired Joanne to help and of course,!

We picked up hay bails, dozens of pumpkins, bought the food, and made all of our decorations. Then the guests arrived including Joanne and her family!

 Dress Up The Door
Grouping pumpkins by the front door is a natural. You can add fall color by 
pushing the stem of tall maples leaves into holes cut into pumpkin top.


Set The Table
If the weather cooperates, bring a table and chairs outdoors 
and set with pumpkins down the center. Place pumpkins generously around to set a mood.


Use a large pumpkin as a container for the apple cider by scooping out all the

seeds until clean. Now, add the cider.  Have extra apples on hand to set the stage.
Canning jars with cinnamon sticks make great glasses.


Entertaining The Kids: 1. Set up bails of hay and place small pumpkins all around. The kids will entertain themselves on a grassy area while painting the pumpkins.

2. Have extra tee-shirts in a basket to protect clothing.

3. Fill muffin tins with a few colors of craft paints; fill large garden baskets for water; provide small buckets to hold paint brushes.

At the end of the day a bonfire is the best part. Here is an idea! Make your bonfire from pumpkins carved with flames. Stack inside a ring of logs.  Ive come up with  a lot of pumpkin ideas over the years but this one received the most oohh's and ahhh's.
Keep a basket of blankets outside for the fall chill.

Better Homes and Gardens magazine  has great ideas for fall entertaining.  You can see this full article in the Better Homes and Gardens Oct. 2010 issue.


Monday, October 21, 2013

Flower Power


Pumpkin Vessels
Earthy Fall Chrysanthemums & Pumpkins make a cheery center piece

I’m always looking for new way to design floral displays and pumpkins and gourds are the perfect shaped vessels. It starts with going to the farm stand and picking out unusual and interesting pumpkins and gourds.

Alison, a friend of my assistant, Monica, has a friend who owns a glorious old barn in Connecticut. It's a perfect backdrop for shooting pumpkin projects. These  projects were designed for Country Gardens magazine for Fall, 2013.

Photographer Andre Baranowski, Monica and I landed here for two days to set up 
and make some Fall magic, 2013.

Monica, Alison and me.

Here's one idea that can work with any pumpkin variety you happen to love. It will bring some seasonal beauty to your home. There's no need to fill the pumpkin with water. However, you will need floral viles filled with water to make it work.


What you'll need:
Assorted mum flower heads and asters in a variety of sizes. You can cut mums heads from your blooming plants or buy plants at the nursery. Take heads from a variety of plants to get the diversity of flower heads in different sizes and colors.

1. You’ll need floral vials that hold water  You can buy them by the bag at a super crafts store or your local florist.

2.  A paring knife for cutting holes in the pumpkin.

3.  Cut the hole the just slightly larger then the head of the vial

4. Fill vial with water, place cape on vial, cut the flower stem to 1.5 inches. Push vial into the hole so flower is flat against pumpkin surface.

Sunday, October 20, 2013

Resuming My Blog!


Getting Started Again
Where did four months go?

During the past four months, I've traveled New England from corner to corner. Along the way, I've had the opportunity to style for many of my favorite magazines and catalog companies.  I've missed posting my blog, and now that the Fall Season is upon us, I'm anxious to get started again.  I look forward to celebrating Halloween, Thanksgiving and Christmas with you!
This past week, I paid a visit to my favorite local far-stands and 
came home with a carload of fall produce.

 
Who wouldn't be inspired by these Fall colors?

Using a variet of colorful Fall produce, I will share with you several awesome projects to help embellish your holiday displays! Starting tomorrow, I'll post my first Fall-Season blog which will include several wonderful pumpkin display ideas. So please stay tuned as we make October a time for celebrating the season together!

Wednesday, May 15, 2013

Coastal Minimalism

As a stylist and Contributing Editor to New England Home magazine, I've traveled along mountainous roads and coastal regions searching for the most beautiful  homes to show you.  During a recent trip, I drove along rural roads through small towns to get to this stunning modern home by Eliot Architects!  The house is situated amidst a forest of tall pines along the coast of Maine.

Photos by Trent Bell


In the current Issue of New England Home magazine you'll read about this fantastic Maine home.  If you appreciate quiet minimalism, this article is a must read. By clicking this link you can get the whole story in a instant!
 http://www.nehomemag.com/article/maine-woods-modern

This was one of those shoots that needed many hands. We were able to get a lot done during this one-day shoot because of the great team working at Eliot Architects.  It takes many hands to hang beautiful art and pull all the pieces for each shot.
It took much planning to decide which exterior shots to photograph. The editing is often the hardest part. Oh, what a view!

This was one of those projects where I could have stayed to work longer than just a day!


Wednesday, May 1, 2013

Fun uses for vintage shutters

Vintage Shutters- 
An Architectural Table Runner

I'm always searching for fresh ideas and new ways to reuse old things. That's what I do! Last Spring, while driving past one my favorite antique and salvage shops, I saw a pile of old wood shutters outside and thought of a neat and fun project: 
Vintage Shutter Table Runners.

The dimensions and architecture of wooden shutters could be used to create a table centerpiece in addition to my Spring Branches assignment for Country Gardens magazine.

Vintage watering cans, a wood wooden shutter and spring branches; now that's a combination for a pretty Spring table centerpiece for entertaining dinner guests.


My friend, photogprapher Michael Partenio helps my projects shine.

"Inviting friends and family to gather around a pretty table is one a most welcoming pleasure. Going the extra mile will make your guests feel special."

Create the look:
1- Use an old, narrow wooden shutter. Make sure the width of your shutter works with the width of your dining table and will leave room for plates along its sides.

2- Place the shutter on a runner or directly onto the table. Place small watering cans on top.

3- Fill the cans with water and add a few Spring branches. Keep the flowers simple and sparse so guests can talk through and over the centerpiece.


Last spring, I provided 7 projects for Country Gardens magazine focusing on watering cans and Spring blossoms.  Look for more fabulous garden and floral ideas in the Spring 2013 Country Gardens Issue!


Thursday, April 25, 2013

Calling All Designers/Architects - Portfolio REVIEW

New England Home Magazine: Portfolio Review

Do you have a project you think should be published?

If you do, New England Homes magazine editor, Stacy Kunstel and I would love to see it.

I'm excited to be part of the New England Homes magazine sponsored event "Designer Portfolio Review" at the Wakefield Design Center on May 8.  Bring  two of your favorite projects and we'll review them for possible consideration in an upcoming issue.

This is a great opportunity to discuss the ins and out of getting published, a great chance to meet see familiar faces again,  meet new friends and talk shop!

If you are wondering what to bring:  Professional shots are great, but not necessary,  pictures taken with your iphone or ipad are great, too. We can look at projects on your laptop or in a formal portfolio book.

Fabulous events worth attending include talk with Cindy Rinfret on her a book signing by as she introduces her latest book, "Greenwich Style: Inspired Family Homes".


Linda Rudeman, Greenwich Style home
If your looking to get a project published this is a great way to get the inside scoop on how to get published.
New England Home
We are looking for projects in all corners of New England, from Connecticut to Maine.

If you want to share a project with us that is not fully completed, we will be happy to see this as well. If your not sure, bring it down.


New England Homes magazines is interested in all of the different styles of design and architecture that make New England so diverse.

Take a glance at this Wakefileld flyer and mark it on your calender, I hope to see many of you there!

 For more information, please contact 203.358.0818 or visit www.wakefielddesigncenter.com 


Monday, April 8, 2013

Forcing Forsythia Branches

Clip Early Spring Branches Now
If you can't wait for Spring, clip a few branches and watch the buds blossom into bursts of color

Two weeks ago I cut my first long branches of Forsythia and placed them in my kitchen window. In just 5 days, the little buds had turned from brown to brilliant bursts of yellow flowers. I've had a continual display ever since by replacing fading blooms with new branches.

While your garden Forsythia is just about to bloom outdoors, it's still a good time to bring branches indoors to add burst of screaming yellow to your floral arrangements. You can enjoy Forsythia  branches weeks ahead of nature's schedule by taking cuttings into your home and forcing the branches to bloom!

Dress up garden urns by placing watering cans filled with forsythia blooms 
on top. It's a great way to move color around outdoors as shown here in the current  2013 Spring" Country Gardens" magazine.

I used Forsythia to style this pretty breakfast room at my friend Maria Taylor's 
home for Better Homes and Gardens story. Its perfect for adding a sunny 
accent with little effort. Make sure to have a tall container on hand to display it.


Forcing Forsythia
Forsythia is the easiest branch to force with guaranteed results.  Cut the longest branches from your Forsythia bushes. Bring them inside and re-cut the ends on an angle with a sharp knife. Add warm water into a tall vase and then add the cut Forsythia branches. Place the vase in a sunny window and watch the magic happen.

 Look for more  Great Garden and floral great ideas 
in the Spring 2013 Country Gardens Issue.


Wednesday, April 3, 2013

Create Impact With Cherry Blossoms

Blooming Branches: 
A wonderful greeting as you enter a room!

Nothing creates greater visual impact to a room than a tall array of flowering Spring-time branches.  Even displaying a single branch placed in a vase can be breathtaking and worth bringing indoors to admire.

A gathered selection of blooming single and double cherry blossoms 
combined with plum branches make up this display. 

I'm fortunate to have a good friend like Shelley Holmes! Shelley invited me to cut several amazingly beautiful branches from her enormous and very old double cherry-tree.  I felt like a kid in a candy shop!

The oversized vintage copper watering can came from a favortie antiques shop in Woodbury, Connecticut, called the French Country Loft. It's great to collect one of a kind containers like this for your arrangements.

Photos by Michael Partenio
I like the simplicity of this white enamel watering can I found at the flea market. It's the right size for a few small cuttings of magnolia flowers.  Cut the end of stem with a sharp knife on an angle and place in warm water.
Here is the Best Way to Cut a Branch Stem:
Using a sharp kitchen paring knife, slice the bottom of the branch in a half vertically ( about 2") exposing center.  In the center of the branch is a hollow vein with small white particles that look like styrofoam. This the the part of the branch that drinks the water. You want to expose the center to the water.  On thinner branches you can also peel away some of the bark or woody material using a paring knife.
To learn more about arranging and forcing spring branches, look for my feature in the current 2013 Spring Issue of Country Gardens magazine.

Monday, April 1, 2013

Grace Your Door With Spring Blossoms

Blooming Branches
Take a few simple cuttings and bring Spring inside

Are you ecstatic when our Spring landscape of trees and shrubs starts to bloom with bursts of color? Spring is the perfect moment to collect cuttings to create Sping-time displays in your home. Last year, Country Gardens editor, James Bagget, asked me to do just that. I used vintage watering cans as vessels for all of the arrangements showcased in the current 2013, Spring issue of Better Homes and Gardens' Country Gardens magazine. I kept the arrangements simple by focusing on the beauty of single blooms.
Photo: Michael Partenio
I loved creating this idea: gracing front doors with decorative vintage watering cans and blooming pear. You too will find vintage, metal watering cans irresistible, especially when they have a painted patina. 

If you have a door knocker or a large nail on your door, this is very easy to make: If your watering can measures 10" in diameter, you will need between 8-10 yards of rope (1/4" hemp available at most local hardware stores).
1- Start at the very front and bottom of your watering can: hold the first 12" of your rope flat  and upright against the can front.
2- Now, while covering this first 12" to secure in place, wrap and layer the rest of the rope around the bottom 5 times (while winding upward) to make a wide band.
3- Finish by bringing ends together in front and knot, leaving long decorative ends.
4- Wrap rope around the side handle in the same manner while leaving excess rope for hanging.  Now wrap the other end of rope around the nozzle ending with a tie to hold in place. Place the can on the door. Then add water along with 1, 2 or 3 branches.  The weight of the water will keep the can in place.

Forcing Branches
You can cut  a several branches from your tree or shrub at any time once the branches have buds. You will have more success the further along the buds are. The closer they are to opening, the sooner they will bloom for you. After you remove each branch from a shrub, use a shape knife to cut the bottom of the stem on a diagonal. To speed up the blooming process, place the branches in warm water and then before a sunny window.

Look for more great garden and floral decorating tips and ideas in the Spring 2013 issue of Country Gardens Magazine!


Tuesday, March 26, 2013

Flower Show Centerpiece: Styling An Easter Table


Styling An Easter Table 
Inviting friends and family to our Easter table is the 
highlight of my Easter Holiday Celebration.

 The Easter Holiday centerpiece pictured below is one I created for next month's April, Good Housekeeping Magazine. It is an arrangement of decorated eggs with readily available Spring flowers. I used soft pinks and blush colors of peach stock, white hyacinth, coral sweetpea and soft pink tulips.

Collecting the simple mismatched vintage milkglass containers for the vases was so much fun. I found them all at local antique markets and shops. Fill each vase with floral foam before adding flowers.


Photo by Michael Partenio
 The table's overall pink hue with colored plates of hot of aqua blue creates a wonderful Easter pallette. I like to make my table runners from yardage bought at my favorite fabric store.  That way I can make inexpensive runners at lengths long enough to run over the ends of the table.  I layered two shades of pink runners: one measuring 16" wide, and another wider runner underneath at 24" wide.  If I have time, I hem the runners.

Here's a time-saving tip: just iron the edges under and use iron-on hem tape for a quick fix!

Photo by Michael Partenio
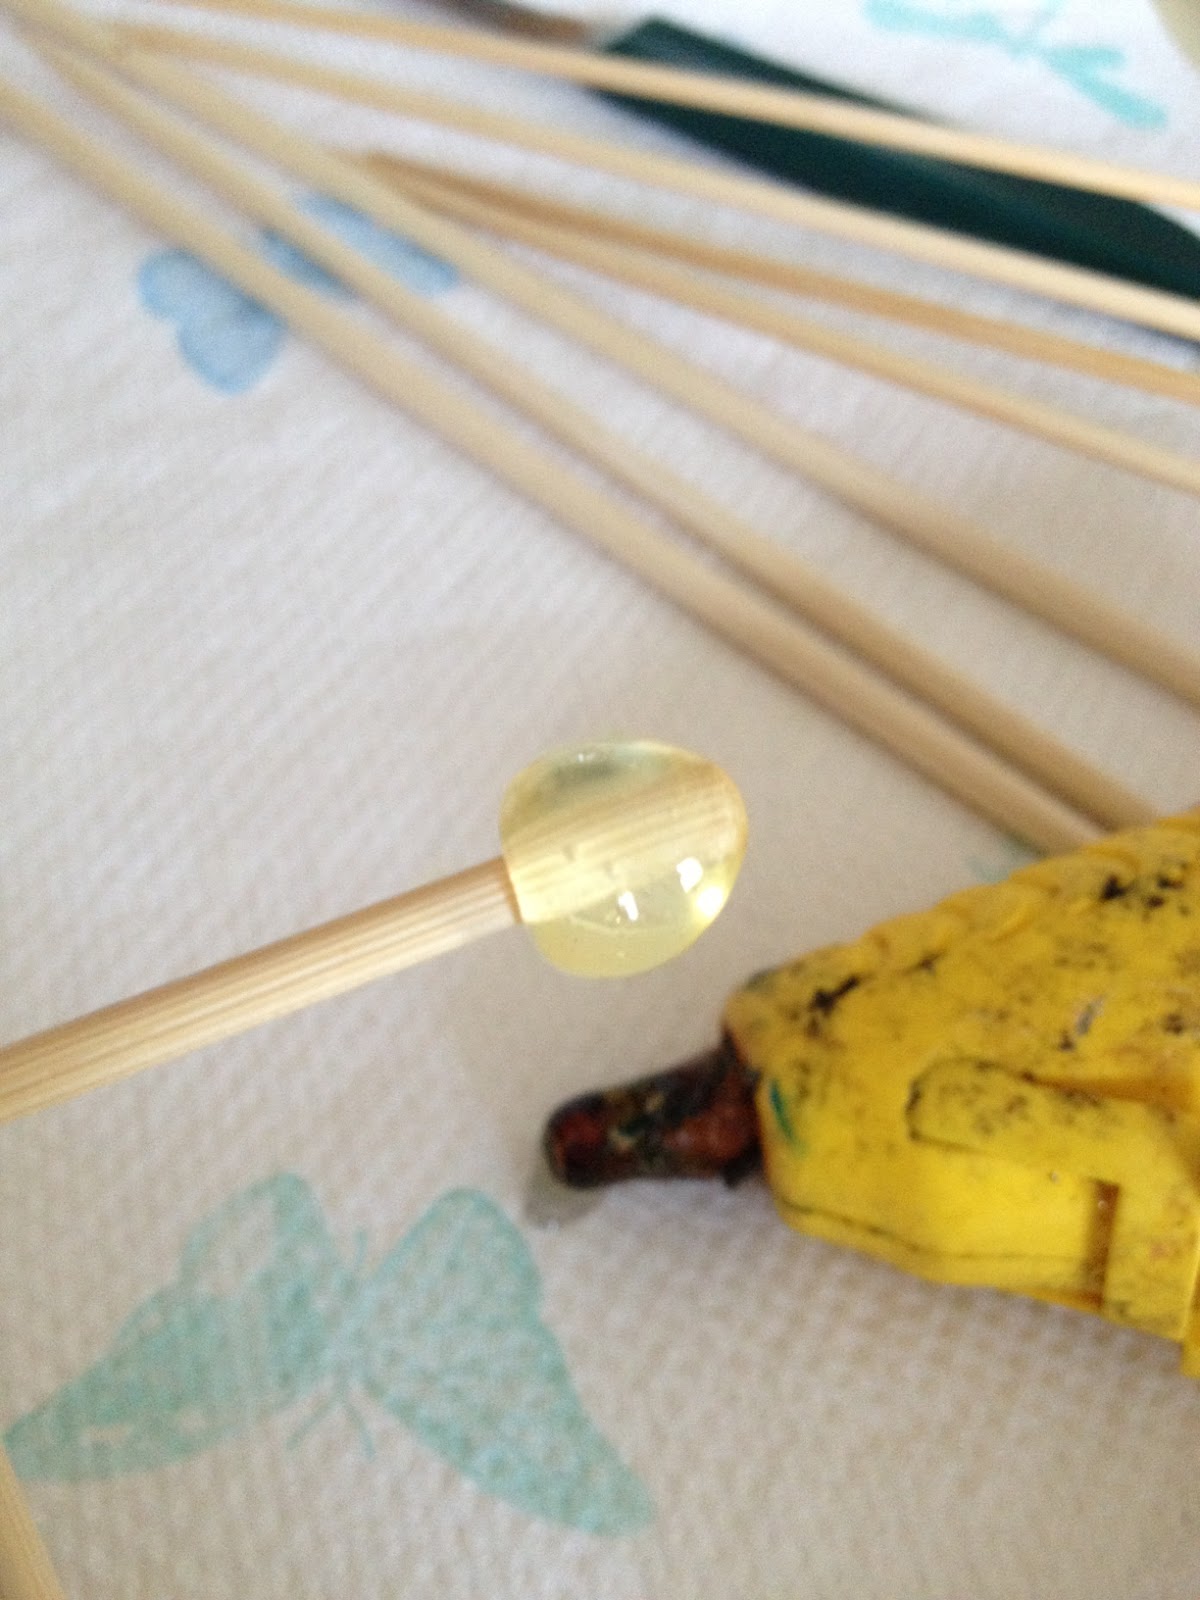
Adding real eggs to this pretty arrangement is a surprising element. The eggs are glued to shish-kabab spears and added as if they were flowers. 

Here is a simple way to add real eggs 
into your arrangements:

What you will need:
- Brown and white eggs (duck, quail, goose or chicken eggs will work)
- Glue gun
- Wooden shish-kabob spears available at your grocery store.

1. Using a small knife or sharp object, poke a hole into the wide end of the egg. Use the knife to enlarge the hole to 1/2".  Use one end of a wood spear to stir egg inside and help force it out of the egg by breaking the yoke. Then shake the egg to remove yolk. It can be stubborn but it will eventually flow out. Using your wooden spear, push a small piece of paper towel inside the egg to wipe and dry clean.


2. Use your glue gun to place a large blob of glue on the flat end of spear.


3. Place glued spear into egg until it rests against the inside bottom. Place large amount of glue on spear where it meets the egg at opening.  Let dry.  The bottom of the egg wil be hidden by the flowers so don't worry about any unsightlyness!


Hint: The small speckled blue eggs on the table pictured above are artifical and from my local craft store. If you can find large artificial eggs at the craft store that have foam centers, the pointed end of the spear can be pushed into the egg. Now you have an even faster application of eggs to add to your Easter Flower Show arrangment.

Thursday, March 21, 2013

A Child's Easter Table: Daisy Eggs & Jelly Beans

A Child's Easter Table: 
Daisy Eggs & Jelly Beans  
Crepe Paper + Easter egg + Jelly Beans = A Super Fun Place Setting

Creating Easter craft projects for kids has always been my favorite part
of the holiday. Making a special place at the Easter Table is top on my list
as a must do.  A little extra effort can make your holiday memorable for
everyone, so let's get started creating this fun Easter Place Setting!
Karin Lidbeck
Photo by Michael Partenio
Wait til you see how easy it is to make this Daisy Egg


What You'll Need:
1- Roll of White Crepe Paper (Available At The PartyStore)
2- Double Stick Tape
3- Scissors
4- Pencil
5- One Dyed Egg - Use Eggs Your Kids Dyed!

Easter

1. Cut crepe paper to 15" length and fold over to make 3 layers @ 5" wide

2. Using a pencil draw daisy petals across the crepe paper. 
Keep petals 1/4 " from bottom edge.

3.  Cut out our daisy pattern.

Add caption
4. Dye one hard boiled egg yellow for each egg daisy.

5. Wrap double sided tape around the middle of the egg.

Starting along the top edge of the double sided tape, wrap the crepe paper 
around the egg while adhering to the tape as you circle egg.


Pull out petals and then push the egg into a 3" painted pot, or a 
plain terracotta pot filled with Jelly Beans.

Place potted Daisy Egg onto each plate!